Oh yes, I love the smell of baking breads in the kitchen, and when you start adding flavors to the bread the entire house becomes especially aromatic and irresistible. On top of that, one of the hardest temptations to resist for me is eating fresh breads when they’re right out of the oven. This past weekend, I was really in the mood to bake something tasty that was a little different–hence bagels. These were amazing right out of the oven.
I created a few different variations on my original bagel recipe that I think you’ll enjoy. My personal favorite is the cinnamon raisin bagel recipe. It’s really good, and I highly recommend it. The bagel recipe described below is one that will only take a couple hours to make, versus one that may take a couple days. I’ve got to say, that if you’re willing to make your bagels over a two-day period, you’ll get a super amazing bagel; however, for those of us who prefer a more instant gratification, I think you’ll find this recipe quite pleasurable and even beyond satisfactory.
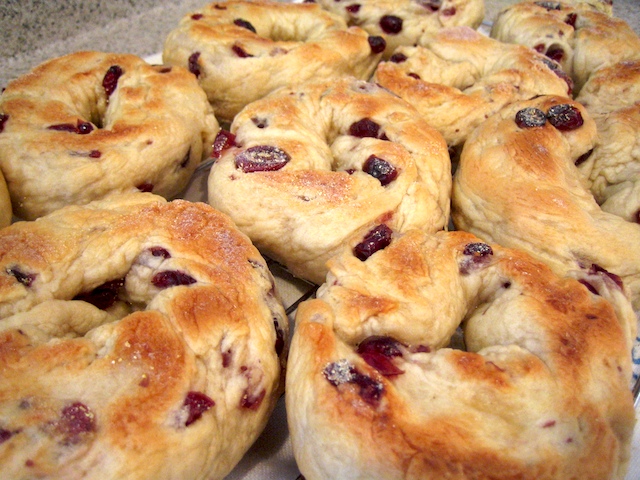
I’ve added a printable recipe at the bottom of this post. I made a few different batches of these bagels and am using mixed photos from those batches, so don’t worry if in one photo you’re looking at cranberries and in the next raisins. So, let’s make these bagels. My 3-year-old daughter, Maggie, helped me make some of these and had a lot of fun.
The Cooking Dish Bagels
Ingredients
Original
Cinnamon Raisin
Orange Cranberry
Garlic Onion
Method
Original Recipe
1. In a large bowl, mix together the yeast and water. Let yeast and water sit for 5-10 minutes.

2. Add sugar, salt, and olive oil. Stir together until the sugar and salt is dissolved.
3. Add bread flour and knead the mixture together in the bowl until flour is incorporated.


4. Remove dough from bowl and finish kneading on counter until dough is uniform and smooth. The dough should be slightly elastic.

At this point, I left the room for a little bit and came back to find my daughter happily eating the raisins, or in her words, “big bugs” out of the dough, and I begin to wonder how many other bugs she’s eaten… I don’t think I want to know.

5. Cut dough in half and roll both halves into long dough logs. Allow dough to rise for 20 minutes.

6. Place hand palm-down on dough, and wrap dough around hand. Once it’s around your hand, pinch it off from the rest of the log. Squeeze the tips together and quickly roll to form the bagel circle. Repeat until both logs have been rolled into circles. To make it easier, I created a quick video to show this action, because I wasn’t quite sure how to put it into words. Compliments to my little 1-year-old, Robyn, for the baby noises in the background while sitting in her high chair eating graham crackers. It was either that or let her hold the camera. Needless to say, I opted for the former. I also learned that rolling bagels with one hand while the other, non-dominant hand holds that camera can be a little tricky, ha ha.

7. Let bagels rise for another 20 minutes. In the mean time, preheat oven to 450°F and prepare a large pan or pot of boiling water. Also, dust a cookie sheet or stone with cornmeal.

8. After the water is boiling, place the bagels in the boiling water and boil on each side for 1 minute.

Remove from water and allow excess water to drip off (or you can place it on a drying rack for 1 minute). Once access water is off the bagels, place them on the cornmeal-dusted cookie sheet (sides can be touching if needed).

9. Bake bagels on one side for 10 minutes. Flip bagels over and bake for another 10 minutes or until golden brown on top.
10. Remove from oven, and cool for a few minutes on cooling rack. Enjoy with a cream cheese schmear.

I made the following cream cheese schmear by adding two tablespoons of my favorite jam (raspberry huckleberry jam) to 1/2 package Philadelphia cream cheese. And because I’m thrifty, I stored it in washed-out baby food cups. It’s amazing how handy those are.

Cinnamon Raisin
At step 2, replace 1 tablespoon of sugar with a tablespoon of honey.
At step 3, add cinnamon and raisins and then continue with the original recipe.

Orange Cranberry
At step 3, add orange zest, dried cranberries, and nutmeg and then proceed with the original recipe.
Garlic Onion
At step 3, add onion. Proceed through step 8, but instead of using cornmeal, lightly grease the cookie sheet with oil or cooking spray. Follow the modified steps below, starting again with step 9.
9. Mince garlic and whip together with melted butter and egg yolk.
10. Bake bagels for 10 minutes on one side, remove from oven and flip bagels over. Using a basting brush, – quickly – cover the tops of the bagels with the garlic, butter, and egg mixture. Place back in oven for another 10 minutes or until golden brown on top.
11. Remove from oven, and cool for a few minutes on cooling rack. Enjoy with a cream cheese schmear.
Add Toppings!
If you want to add toppings to these bagels, you can easily do so right after pulling them out of the boiling water. Have your sesame seeds, poppy seeds, etc. spread out on a plate and when the access water drips off the bagels, simply press the bagels down onto the seeds. You can also sprinkle them on top, but not as many of them will stick to the bagel.
Wrapping Up
After all was said and done, I gave my same bug-eating 3-year-old daughter a fresh cinnamon raisin bagel. She held it out in her little hand for a little while, eyeing it closely and muttering under her breath, “bugs.” Silly kids. First they want them, then they don’t. Once she realized they were raisins, which she loves, she ate it pretty quick.

Of course eating a bagel is like eating a Reese’s Peanut Butter Cup. I don’t know if anybody does it quite the same. But, just for the heck of it, here are my favorite three ways to eat them.
- Fresh out of the oven with plain cream cheese.
- Cut the bagel in half, spread plain cream cheese on both halves, stick back together and nuke it (microwave it) for 30 seconds. I usually add enough cream cheese that it doesn’t all get absorbed by the warm bagel.
- Toasted with a honey almond cream cheese spread.
Download
“Recipe for The Cooking Dish Bagels” (PDF, 2 pages, 156 kb)


I love the video. And that last picture of your daughter is awesome–black and white with the bagel in color! Keep up the good work 🙂
Thanks Travis 🙂
As always, I appreciate reader feedback.
Great Great Bagels! So easy too! Thanks for the recipe!
I’m glad you like them. I think they’re a lot of fun to make, and they’re especially delicious right out of the oven. So yummy.
There is an incredible sandwich that goes with these homemade bagels! Toast in the oven or microwave (oven is best) on a bagel flavor of your choice, slices of green and red peppers, top that with slices of tomato that are salted and peppered, than add a slice of cheese. Toast until hot through! This is a great dish for luncheons.
I like that sandwich. Unfortunately I rarely have bagels to make it with, so I use whole grain bread.
I am going to try to make your bagels. This is the first time I have looked at your blog I am sorry to say. You are doing a great job and I will be back.
I have made many bagel recipes and yours is the best I have made…I have only one problem with all bagels I make, they puff up beautiful when placed in the boiling water but when I take them out they seem to deflate and are not as thick as I would like them…am I doing something wrong…I dry them on a cooling rack. I have just made the orange cranberry ones…..they are baking now and smell mmm good.
Hi Sandy,
Thanks for the compliment 🙂 It always makes me feel good to know others are enjoying these recipes.
Here are a few thoughts that come to mind as to why your bagels may be flattening…
Instead of using a cooling rack, set the bagels on a slightly damp, soft cloth (no fuzzies) just for a couple seconds to soak up the water, and then place them on the baking sheet. It’s okay if the bagels have a little water on them when they go into the oven.
Because the bagels come from really hot to a cool temperature, it’s natural for them to get a little wrinkly. Try to keep your baking room a little warmer so the hot to room temperature difference doesn’t create such a large effect. Most store bagels that I know of actually steam their bagel dough instead of boiling it and then keep them at warm temperatures as they’re moved into the oven. The slow steaming helps the dough keep an even, smooth texture. My home bagels are always a little wrinkley, but usually during baking, they slightly rise again.
Also, try letting your dough rise a little more before boiling it, so that when they come out of the hot water they’re SUPER large. I’m always surprised how large mine are coming out of the boiling water.
Hope those ideas help, let me know if you have any other questions.
I have never made bagels, but I’d appreciate it if you’d make some for me. I promise I would eat them!
Bagel party! We could probably work something out :).
I know some Cream Cheesebenders that I could invite.
LOL! You’re killin’ me.