Howdy, this post is going to deviate a bit from the normal. Rather than talking about food, I want to share a few insights I’ve learned about hosting images on my website using flickr. It’s been helpful for me over the years, so perhaps it will help you too.
I’ll admit upfront that the title of this post is a little misleading. Flickr isn’t a true Content Delivery Network (CDN). As far as I’m aware the their servers are somewhere on the East coast and all images load from that location, not from the server nearest to you.
A couple years ago, I received a message that my bandwidth and yaddi yadda was pushing capacity and that my website images were the main culprit.
Enter CDNs.
I worked with a few different CDN solutions such as CloudFlare, Rackspace, and CloudFront (Amazon S3) to determine what might work best for what I needed. Setting up and using these with WordPress wasn’t bad, but committing to a price wasn’t in the cards. (There are too many things to subscribe to these days, know what I mean?) I also found changes to existing content on the website took forever to populate on all the servers, especially images, and the wait drove me bonkers. (Note: It’s possible that a CDN is in your price range. If so, check out this nifty guide to picking one out.)
Enter flickr.
A year into my CDN experimentations, flickr changed their image hosting strategy, allowing each user 1TB space—for free. Hmm… lots of space. Free. Simple. No subscriptions. Boom. Sold. Yeehaw. Tie that hog, and let’s roll.
After I decided to make the switch, I was up and running in no time. Now that I’ve been using this method for over a year on various projects, I can say that it works, and so far I’m still satisfied.
Have you already decided that flickr is for you? You can skip ahead to the “how to” section. If not, read on my friend.
Why Use flickr?
Flickr has more advantages that just 1TB free space (which I’ll go into in just a second).
Faster Image Loading
While Flickr doesn’t distribute images like a true CDN (perhaps in the future?), it can still decrease your website’s load time, especially if you’re on a shared server. Most servers are set up for general use and not necessarily optimized for one thing over another. Flickr’s servers are optimized for one thing: sharing photos.
1TB Free Cloud Storage
Hot diggity dang! That’s 500,000 photos at 2MB each, or 200,000 photos at a higher 5MB each. Your smart phone’s images are in between 1.5MB – 2.5MB each. A large .jpg image is between 3-7MB (yeah, it kinda’ varies).
Depending on your proclivity for posting photos, it’ll be a long, loooong while before that space is used.
Easy Upload and Sharing
Uploading images to flickr is easy peasy. You can drag and drop the photos you want uploaded, give them names, titles, keywords, and assign them to different albums and collections as well as specify a copyright level.
As an added bonus, photo applications often include an in-app flickr upload tool where you can upload to flickr directly from the application. I often use Aperture’s flickr upload for my own projects.
Easy Sharing
Flickr also allows you to share your images via major social media sites such as Facebook, Pinterest, and Twitter or other sources like email. This comes in handy when others are interested in using your work for their own projects.
Avoid Messy Website Transfers
This by far is my favorite reason to use flickr. When downloading and moving your content from one source to another (switching domains, hosting, blogging systems, etc.) having your pictures embedded from a third party prevents what can become a super messy content transfer when images no longer have the same path as before or no longer show up in your media library. This will save you hours of time.
Easy Portfolio
Yet another reason to use flickr is that you can make a quick portfolio album and have it readily available no matter where I go, viewable on any mobile device. If you don’t already have a portfolio section on your website, this is a great way to go.
Maybe flickr Isn’t for You…
While I use and love flickr, you may find that it’s not quite what you’re wanting. While flickr’s pro service provides more space and more functionality (at a hefty price), it may not be as forward-thinking as you are.
If your photography is THE REASON for your website, perhaps another service such as SmugMug would be more beneficial to you, where you have access to all that flickr can do plus much, much more (sell your photos, anyone?). SmugMug’s features are worth a look, just in case.
Instructions for Using flickr on Your Website
Now that all my wind-baggery is out of the way, let’s get down to business and take you through the ropes.
Create a flickr Account
Flickr is a part of Yahoo!, so if you already have a Yahoo! account, you can use that. If you don’t, simply visit https://www.flickr.com/ and click the Sign Up button at the top of the screen. Follow the onscreen instructions to make sure your account is created.
When you have some time, make sure you go to your flickr settings and assign yourself a unique URL and screen name using your name or business name. This will help others find your content more easily.
Uploading Photos to flickr
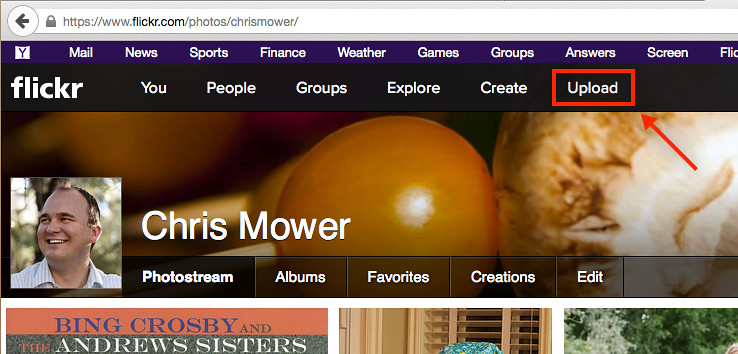
Once your account is created, you can click the Upload button near the top of your Profile’s page to begin the upload process.
You can drag and drop the photos you want onto the big black flickr window and it will begin the upload process for you. Or, you can be old-school and click the big pink button and search for them through your Finder or Windows Explorer.
Your photos will begin uploading the moment you drop them into the window. Depending on how many you have, you may be waiting anywhere from a couple seconds to 5-10 minutes (hundreds of photos). I prefer to upload 1 project at a time and usually only end up waiting a few seconds for around 30-50 photos.
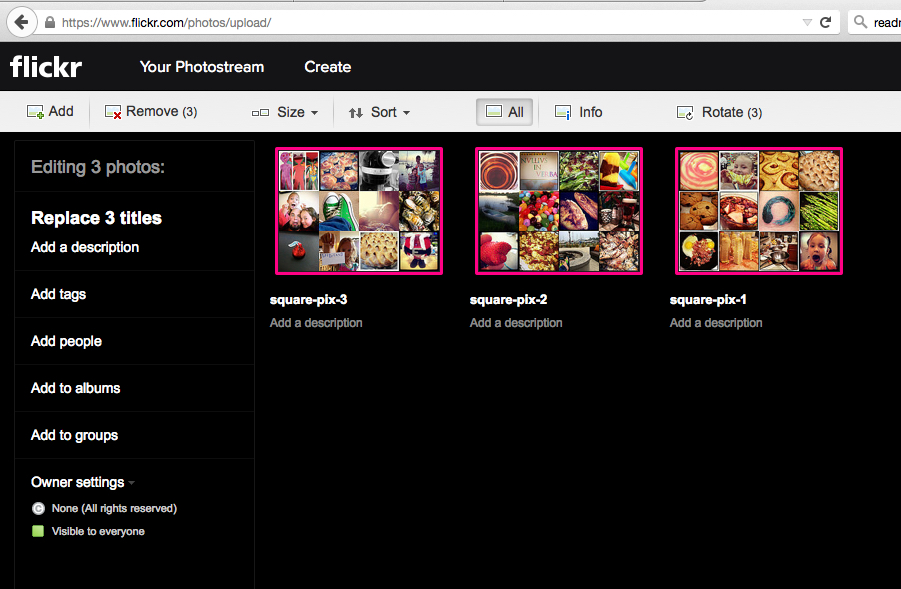
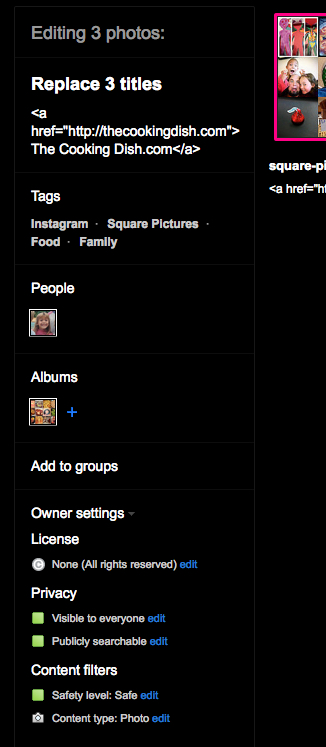
From here you can batch edit by selecting multiple photos at once, or just edit one at a time. Here are a few things I would recommend doing at this point:
- Add a URL to the description. This might be your main website URL or the URL of a specific post. If you want it to be a link, you need to use the HTML, for example: <a href="https://thecookingdish.com">The Cooking Dish.com</a>
- Add your pictures to an album. I have found that it’s the easiest to do it at this point than later on. I usually create a new album with each project and/or blog post for easier organization and access, naming the album something similar to my blog post.
- Set the Rights. I usually set my photo rights as 'None (All Rights reserved)'. This basically means that all rights belong to me and nothing can be used without my express permission. While not everyone obeys copyright rules, the majority of people are good like that. You can read about the other licenses at CreativeCommons.org, or Ananova.com. Also consider this small post from lifehacker.
- Add tags to help others find the pictures in search engines.
- Add Any people who may be a part of the pictures.
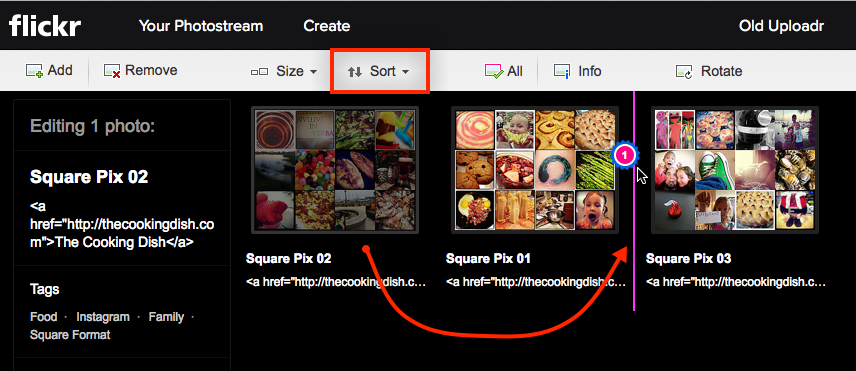
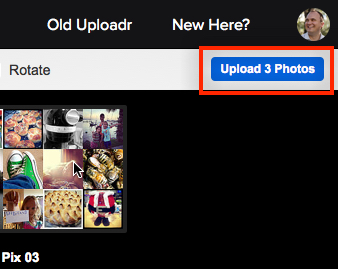
Okay, so far not so bad, right? At this point you can use the tools at the top of the flickr upload page to sort or rotate pictures. In addition to sorting, you can also drag and drop individual pictures or picture clusters to another position. If you want to rename any pictures, you can do that as well.
Photostream. Top-left picture on upload page displays first in photostream, ending with the bottom-right picture.
Album. Bottom-right picture on upload page will display first in the album (and be used as the album cover). You can change the album cover later as well as the order (Click You > Album > Edit >. Drag and Drop in the order you want and save.
Once that’s done, you can click the blue flickr upload button in the top-right corner to finish the import. It will ask you to confirm that you want to finish the upload. If you’re sure, confirm and let flickr work its magic. Keep in mind that the more images you’re loading, the longer this will take. It also depends on your internet connection speeds.
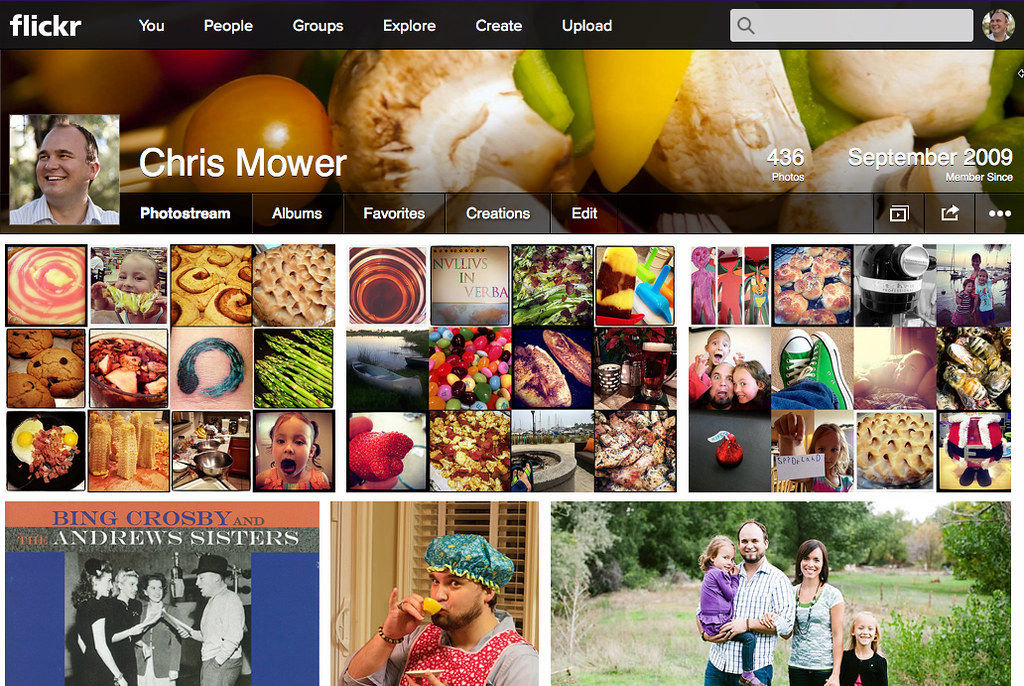
Once the upload is complete, you’ll automatically be taken to your photostream where your new flickr photos display in a sexy grid pattern, adjusted to best fit your browser size.
Embedding (Displaying) a Flickr Image on your Site
There are multiple ways to share and embed flickr photos. I’ll take you through my preferred method, and how I embed my flickr photos to this WordPress site.
Although WordPress already has a super fast and easy way to embed flickr photos, it doesn’t let you choose the image size or any other options. You can read about that method on WordPress.com’s flickr support page. You could also use a flickr plugin, but then you risk code conflicts with other plugins, vulnerabilities, and it also makes your site that much more bulky (which we’re trying to avoid).
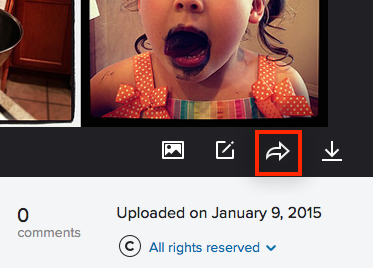
Once you have uploaded your photos and organized them how you want, you can click on the photo you’re interested in, which brings you to the photo viewer.
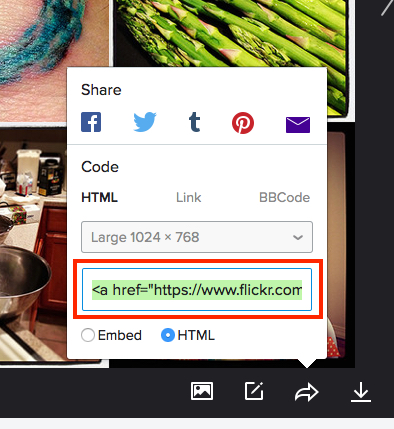
At the bottom-right of the picture there are action icons that let us do all sorts of stuff. The one we want is the curvey right “share” arrow.
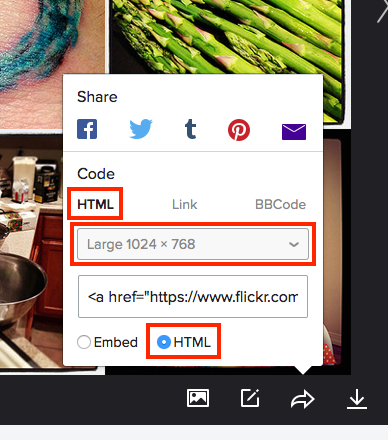
Click the share arrow and then…
- Select HTML.
- Select your image size.
- Select the HTML radio button.
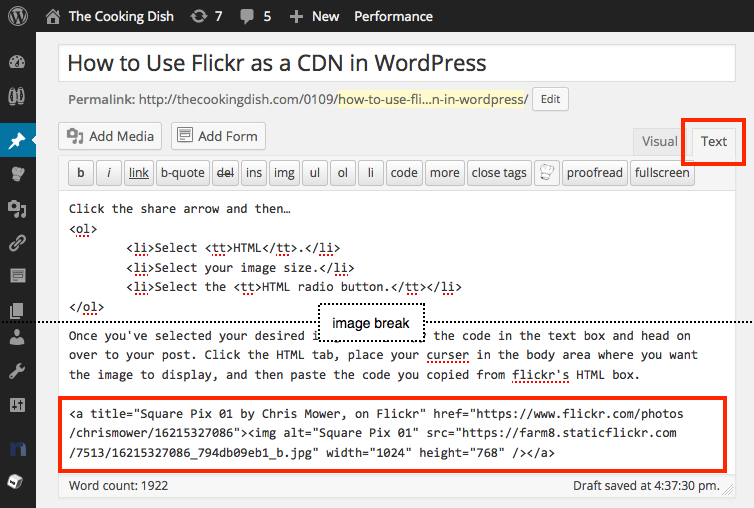
Once you’ve selected your desired image size, copy the code in the text box and head on over to your post.
Click the HTML tab (No fear! You can do it!), place your cursor in the body area where you want the image to display, and then paste the code you copied from flickr’s HTML box.
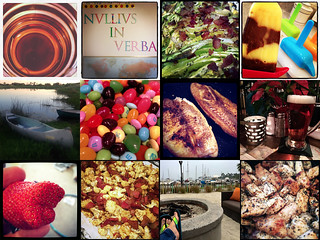
When the post is published, the embedded image will display like so:
Here’s an example of an image embedded at a medium size:

At this point, you can then switch back to the 'Visual' tab (next to the 'Text' tab) and select the image to make any edits you wish, or you can edit your link yourself by adding a target or class.
I usually add target="_blank" to my flickr embeds so that they open in a new tab or window. I also give it a special class so I have more control of the image in my code (tutorial for another day, perhaps… it’s extra, not necessary):
<a title="Square Pix 01 by Chris Mower" href="https://www.flickr.com/photos/chrismower/16215327086" target="_blank"><img alt="Square Pix 01" src="https://farm8.staticflickr.com/7513/16215327086_794db09eb1_b.jpg" width="1024" height="768" class="aligncenter flickr-img" /></a>
And that’s it! In the grand scheme of things, that’s no so bad, is it? Now that your photos are on flickr, you can embed and share them at will on your website. You can use that same code to paste into a text widget to display a flickr photo in any of your widget areas.
And as always, I’m curious to know what you do for your blog as well. Feel free to comment below.



This was great Chris! Thank you. The instructions were really simple to follow.
Awesome! I’m glad it worked out for you! Something to keep in mind is that WordPress can’t have an embedded image as it’s featured image. So I still upload my featured image to each post for that purpose (also so that Pinterest has something to snag on to).
Ah! Good to know.
Actually you can use flickr photos as a featured image, there is a free wordpress plugin for this purpose.
Thanks. You’re right, you can. I try to avoid doing that for the main reason of SEO on my website. Having at least one picture on a post that’s hosted on my own is helpful.
It´s nice, but how you can use a Flickr photo into a set page (the post image that you display in your homepage).
Hi Pablo,
In WordPress, you have the ability to set the featured image for each post and page. This is the image used by themes whenever the post or page is displayed anywhere, such as the homepage or in a widget area. As it goes, WordPress only lets images that have been uploaded to the website itself be used in that featured image location. I always upload at least one image to my posts for this purpose, and also for pinning.
Hopefully that answers your question. If not, please let me know.
Is there any way to embed an entire flickr album as a simple slideshow with captions into posts and pages?
Thanks
Hi Hari,
I’m not aware of any default WordPress of Flickr functionality that allows for Flickr slideshows. Flickr used to let you create slideshows, but they discontinued it about 2 years ago I think. You can probably find some plugins out there via the Plugin Directory or even Code Canyon. I’m also pretty sure there are some Flickr slideshow generators out there as well. Wish I had a perfect and easy solution for you, but hopefully that might point you in a good direction.
I personally try to avoid slideshows in my posts as I think most people lose interest in them after the first 5-7 slides, and depending on how they’re created they may not be responsive for mobile devices and touch.
Thank you very much for this Chris. You’re right about the messy website transfers. That’s exactly what happened to me (changed domains, old domain expired…) and now I’m cleaning up the mess that are my photos not showing up because their links point to the old domain. Wish I had offloaded my photos to Flickr sooner.
Great post!
Hopefully I’m not too late to the clean up party (I’ve had a few of my own). If you have access to your MySQL databases via phpMyAdmin or another database client, you can run the following query replace your old URL with your new one in your pages and posts. This will save at least a little bit of time.
UPDATE `your_table` SET post_content = REPLACE (post_content, 'http://www.oldsiteurl.com', 'http://www.newsiteurl.com');You will want to be sure to use your own table name (usually ends with _posts) and also use your old and new site URLs. Hope that helps as well.
Can’t we just upload an image to any of the major social media sites and then right click “copy image URL?” You can then upload the URL to wordpress using the add URL feature. This way you are using the big companies server.
If you’re using your own images, yes, you can. There are legal issues if you’re just using any image though that doesn’t originate with you.
Also, something else that you’ll need to keep in mind is that most social media sites compress your image so that the quality of the upload is not equal to, and sometimes is significantly lower than, the original. Flickr is designed for high-quality photography.
Hi Chris, Thanks for this info. I’m wondering if you’re seeing the new flickr watermark on your photos as you upload them into wordpress. I’ve been doing the same steps that you have outlined here for years on my blog and suddenly there is a flickr watermark and title when you hover over the photos with the mouse. Even in flickr pro. It’s annoying enough to make me stop using flickr for now but I worry about photos taking up so much space on my bandwidth. Any suggestions? Thanks!
I haven’t noticed any flickr watermarks on my images, sorry. Do you have an example one I can look at?
Thank you for writing this post! It’s really easy to get bogged down by too much information on google and never the one thing you’re looking for. This how-to was exactly what I needed.
Hi Emily, I’m glad it worked out for you!
Hi Chris,
This is really smart and well done tutorial. I have carefully developed a plugin in order to easily take advantage of this amazing free Flickr space. It allows to upload directly from wordpress to your Flickr and also allows to set feature images and galleries.
Have a look and tell me what you think if you wish! I am commited to constantly improve it to make it as easy as possible to use Flickr as CDN. Here it is: http://www.onecodeshop.com/downloads/wordpress-flickr-pro-extension/
Cheers,